Using a track log to assign locations
Image geo-locations can be set from a GPX track log. Use ⌘L, or Edit -> Locn from track, or right-click -> Locn from track to update the location of selected images from the track log.
Locations are determined by matching image timestamps with GPX log trackpoint timestamps. This comes with some caveats:
- The date/time assigned by a camera does not include a time zone. It may or may not reflect the actual time where the image was taken. GeoTag assumes Camera time is set to the same time as the computer running GeoTag. If the camera was set to a time in a different timezone you must adjust the time zone (see next item) that GeoTag uses before assigning locations using a track log.
- The track point with a timestamp closest to, but less than or equal to the image time stamp is used for image location.
- If the camera date/time is incorrect wrong geo-location data will be assigned.
- If the track log coveres a period of time before the pictures were taken the last point in the track-log will be used as the geo-location for all images.
- If the track loc covers a period of time after the pictures were taken no geo-locations will be assigned.
Assigned locations can be tweaked by selecting the image to modify and relocating the marker by clicking on the desired location on the map.
Adjusting the Time Zone to match the track log
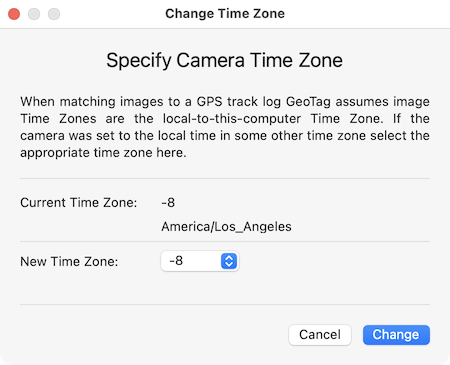
This feature was added in GeoTag version 4.12. Use it to tell GeoTag the Time Zone of the date/time set in the camera. When selected a window is opened to allow modification of the time zone.

Adjust Time Zone Window
Click on the New Time Zone control to pick one of the standard time zones used throughout the world. When a tme zone is selected the date/time of images will reference this time zone when matching a GPS track log. GPS track log timestamps are always in UTC – no adjustment is needed.
For proper track log matching the selected time zone must match the date and time in your camera when the image was taken. The time zone of the location where the picture was taken is irrelevant for matching track logs. If the camera date/time was set to the same time as your computer no adjustment is needed.
Interpolating image locations
GeoTag can interpolate positions for images between two images with assigned locations. This might be useful where you know starting and ending locations and would like to approximate where on the straight path between the two other images may have been taken. To use this feature:
- Load a series of images to be tagged into GeoTag.
- Assign a location to the first image in your series of images.
- Assign a location to the last image in your series of images.
- Select all images in the series from first to last.
- Use the menu item “Edit -> Interpolate” or the Interpolate item in the control (right) click menu to assign geo-locations to the intermediate images in your series of images.
Modify Date/Time of images
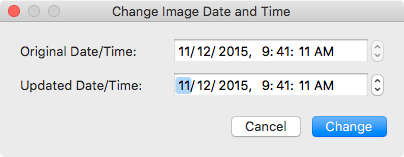
There are two ways to modify the Date/Time that an image was taken. The first way is to double click on the Date/Time column in the row in the table for the image to be modified.

Modify Date/Time Window
This window is created showing the current Date/Time and a Date Picker to let you select a new Date/Time. Hitting the return key or clicking the Change button will apply the new timestamp to the image. Hitting the esc key, clicking the window close button, or clicking the Cancel button will close the window without making any changes.
Alternatively, multiple images can be selected and modified. After selecting the images to change hit ⌘T, or Edit -> Modify Date/Time, or right-click -> Modify Date/Time. The same Change Image Date and Time window is opened for the most selected image. Update the Date/Time and hit enter.
A time delta between the new and the original Date/Time is calculated. That delta is then applied to all selected items. This can be used, for example, to tweak the time in cases where the camera time was wrong but you want to set image locations from a GPX track log.
Modify image location from keyboard
There are two ways to modify image Location by entering Latitude and Longitude. The first way is to double click on either the Latitude or Longitude column in the row in the table for the image to be modified.

Modify Location Window
This window is created showing the current Location (if present) in the format you picked in program preferences. Regardless of the display format data can be entered in several different formats: All degrees, degrees and minutes, degrees, minutes, and seconds. A N/S/E/W reference can be specified or a negative number of degrees can be used to indicate S latitudes and W longitudes. Entry of °, ', or " symbols is optional. Degrees, minutes, seconds, and reference should be separated by at least one space.
Hitting the return key or clicking the Change button will apply the new location to the image. Hitting the esc key, clicking the window close button, or clicking the Cancel button will close the window without making any changes.
Alternatively, multiple images can be selected for modification. After selecting the images to change hit ⇧⌘L, or Edit -> Modify Location, or right-click -> Modify Location. The same Change Image Location window is opened for the most selected image. Update the location and hit enter. The entered location will be applied to every selected image.